Sunday 1 September 2013

Porchetta style Pork Loin

This is all Nick's idea, not mine I'm afraid!!  But it looks too good to miss an opportunity in sharing.

I cannot tell you how good our home smells right now! 

I bought a pork loin in the reduced section of the local supermarket and Nick suggested cutting it flat and adding a layer of stuffing so that it cooks inside.

He is sat with me now to talk through the pictures.  By the way, I love living with a chef!!


Here is the stuffing made and ready to go. 
We used a supermarket brand but you could always make your own.

Place the stuffing between two sheets of clingflim (plastic wrap).

Use a rolling pin to roll the stuffing to the length of the meat.

Nick decided to be "chefy" here and measure the stuffing exactly to the meat.
You could always just press the stuffing to the meat instead of rolling it out, if you like.

The stuffing on the meat, ready to roll.

Carefully wrap the meat on to itself.
 
You want the crackling on the top.

Tie the meat using kitchen string.
Don't worry about the stuffing coming out. 
Nick pressed it to the meat before it went into the oven.

Nick used some carrots, onion, a couple of garlic cloves and some thyme to help make a stock for the gravy.

Ta dah!! AAAmazing!
Cook the meat at 230'Cfor 20 mins and then turn the owen down to 190'C and cook for approx 30-40 mins according to the size of the joint.  If you use a meat probe, the temperature should be 65'C when done.


I cannot tell you how much I'm looking forward to this dinner.

I know.  I am very VERY fortunate.

Summer Squash Pesto Bites - perfect for canapes

I am so pleased with this appetiser idea! 
(Summer squash look like - and are really - yellow courgettes.  They have a taste of pumpkin, though, and the seeds are scrummy!)

 
We had some cold meats to serve and these added another texture and flavour.  Please note - these were the first of our tomatoes to grow!! 4 sweet red baby plums :)
I posted a recipe for my homegrown arugula/rocket pesto in July.  I put it in the freezer, as promised, and I planned to enjoy it in the colder months but I had a brainwave for an appetiser idea.


Nick cut the summer squash with a mandolin for me.  If you don't have one, just try and cut the vegetable thinly and evenly.


Chargrill the pieces until they are just golden.  I love the lines created by the pan.  Don't grill them too much otherwise the seeds come loose and the squash becomes too floppy.

Let the squash pieces cool down.  Nick some cling film (plastic wrap) over the bowl while we went to water the garden, which could have made them too wet.  They turned out ok but next time I would let them dry a little.

Lay them out and use a teaspoon to spread some pesto on each one.


Roll them up and stand in a cluster to serve with your cold meats.

 
They are cool and nutty with the mixture of squash seeds and pine nuts.
My Mum LOVED these, which is a good compliment!

Monday 26 August 2013

Gift ideas - easy peasy candle making

Have a go at making some homemade candles as gift ideas.
You can even melt old candles down and get quite creative with layering, etc!
 
Rose scented teacup candles


Kitchen candles
 
So on this blog back after Christmas 2011, I said that I received a candle making kit and planned to make some gifts. It only took a year and a half to do!  I really wish I had started earlier.
 
I recommend buying a few things first:
 
- I bought a pan to melt my candle wax in. I found it in a charity shop.  There is no chance I would risk using any of Nicks pans!!
 
- I also picked up some tea cups and saucers from charity shops (thrift stores) that I thought would make good gifts.  The French tins are from cassoulet that we bought last October.  I thought the labels were adorable so saved them to make my kitchen candles.
 
- aromatherapy oils.  I used rose oil for the tea cups and bergamot and lemon for the kitchen candles.
 
- these wicks below.  I got these in a craft shop.  It meant I didn't have to worry about tying them up.


- These held the wicks still and helped me keep them central. Perfect for the cups and tins.

 
My candle making kit explained how to melt the candle wax pieces in a pan over a larger pan of water.  You MUST NOT let the wax boil so keep an eye on it. 
 
Make sure you put your wick in your container in the centre so that the wax melts evenly when the candle is lit.
 
Once there are no more solid pieces, add the aromatherapy oil.  Make sure you mix it in as I noticed the oil at the bottom of the pan and last to go in my containers.
 
Pour the wax into your containers.  Leave a couple of cms from the top.  Once the wax has set, trim the wick to just below the level of the container.


And there you go!!
 
Another Christmas gift ready.  SO cheap and homemade!


Tuesday 20 August 2013

Christmas mincemeat - make now, store for December

So Nick's Mum has a Mason jar of mincemeat in our fridge that she made a couple of years ago.  Hearing that she had made the filling as we ate some homemade mince pies last Christmas was pretty inspiring.  I am so looking forward to giving my mum a jar to use and knowing I made it.


I followed Delia (sorry, St. Delia!) Smith's recipe which was super simple.

My only grizzle is the 3 hour oven bake the following day, which is expensive to do - in my opinion.  But I also made a cake for friends at the same time and it ended up working out for them to be finished at the same time.

This recipe made 2 jars of mincemeat.  I did press it down to make sure I didn't have too much air in the jar.  I'm not sure whether that was right or not, but it meant that I have only 2 jars.  I may make some more and give them away as gifts...

I split the mixture in half and added the brandy to one so that I have one boozy and one not.

 
The dry ingredients.

I added the apple at the end...
 

I meant to say that I put the rind from the orange and lemon in a bowl and added 2 Earl Grey tea bags to the juices.  I thought it would be nice to infuse some Earl Grey in there.  Next time I would heat the juice a little to make sure it works. 
 

After bringing the mix out of the oven. It didn't look like there was fat floating on it, as the recipe states but I did use vegetable suet.  Maybe that made a difference.  Keep stirring it as it cools.  I out a clean cloth over the pan and went out so it was a bit congealed by the time I got back...


So, enough chatter.  On to the recipe:

Home-made Christmas Mincemeat

Home-made mincemeat is dead simple to make. But in the past people used to have trouble storing it. This was because the high percentage of apples oozed too much juice and the juice started to ferment. In the following recipe the mincemeat is placed in a barely warm oven and so the suet gradually melts and as this happens it coats all the fruits, including the apples, sealing in the juices. Vegetarians can make this mincemeat happily, using vegetarian suet.

Makes 3 lb (1.35 kg)

This recipe is adapted from Delia Smith’s Christmas.
Ingredients
 8oz (225g) Bramley apples, cored and chopped small (no need to peel them)
 4 oz (110 g) shredded suet
 6oz (175 g) raisins
 4oz (110 g) sultanas
 4oz (110 g) currants
 4oz (110 g) whole mixed candied peel, finely chopped
 6oz (175 g) soft dark brown sugar
 grated zest and juice 1 orange
 grated zest and juice 1 lemon
 1 oz (25 g) whole almonds, cut into slivers
 2 level teaspoons mixed ground spice
 ¼ level teaspoon ground cinnamon
 good pinch freshly grated nutmeg
 3 tablespoons brandy
Equipment
You will also need 3 x 1lb (350ml) preserving jars and 3 waxed discs.

Method

All you do is combine all the ingredients, except for the brandy, in a large mixing bowl, stirring them and mixing them together very thoroughly indeed. Then cover the bowl with a clean cloth and leave the mixture in a cool place overnight or for 12 hours, so the flavours have a chance to mingle and develop. After that pre-heat the oven to gas mark ¼, 225°F (120°C). Cover the bowl loosely with foil and place it in the oven for 3 hours, then remove the bowl from the oven. Don't worry about the appearance of the mincemeat, which will look positively swimming in fat. This is how it should look. As it cools, stir it from time to time; the fat will coagulate and, instead of it being in tiny shreds, it will encase all the other ingredients.
When the mincemeat is quite cold, stir well again, adding the brandy. Pack in jars that have been sterilised (see below). When filled, cover with waxed discs and seal. The mincemeat will keep for ages in a cool, dark cupboard but I think it is best eaten within a year of making.
NOTE: To sterilise jars, wash the jars and lids in warm soapy water, rinse well, then dry thoroughly with a clean tea cloth, place them on a baking tray and pop into a medium oven, gas mark 4, 350F, 180C, for 5 minutes.
RECIPE COST: £3.65

Thursday 15 August 2013

Asian style sweet and zingy pork belly

When I met Nick last spring, he introduced me to pork belly.  I had eaten it before but Nick (being a chef) is able to crisp up that fat and create dreamy suppers with this juicy meat.  It's naughty and I feel like a child sneakily eating some cake every time.  And just like the gooey chocolate cake, it is SO GOOD!

Combined with some gravy made with the meat juices, I am in heaven.  There's rumour that I may have also drank some of said gravy directly from the gravy boat when Nick turned to the kitchen.  I don't know who would do such a thing.....!!


We bought a pork belly meal from M&S a while ago and cooked it last night which filled the house with a smell similar to hoisin duck.  (We LOVE hoisin duck!)

It was tender and had this sweet glaze that made a meat that is already moreish, a dish that melted in our mouths and created sounds of agreement that this was better than GOOD!

The meat had been marinated and came with a sauce to put on top for the last 10 minutes of cooking.

Listen, it looks like it takes FOREVER to cook but I promise you it will be worth it, even if JUST for the yummy smell in your home.

On this misty and murky morning I'm still thinking about it.  We noted the ingredients to the marinade and hope to recreate it ourselves sometime.

Take a look and see if you can figure out the quantities!
(Obviously, the quantities will decrease as you go down the list)

Marinade:
muscovado sugar      (no wonder it was good!)
light soy sauce
garlic puree
red chillies
fish sauce
ground spices - ginger, cinnamon, cloves, star anise
rapeseed oil
lemon juice

Coat the meat and make sure you save some for the day you cook it.

Marinade the meat overnight in a disposable baking tray.

Cooking directions:

Set oven temp to 190'C/170'C fan/375'F
Put the marinated meat into the oven on a disposable tray. (This is messy and the marinade caramelises to a burnt sugar.  I would NOT want to get that out of my pans!)

Bake the pork for 1hr 15 minutes.

Then remove from the oven and spoon more marinade evenly over the meat. 
Return to the oven for 10 minutes. 
Allow the meat to rest for another 10 minutes before carving.

Healthy snack ideas - oven baked tortilla chips

Last night we made turkey breast fajitas and as much as I planned to have it on salad and no tortilla breads, I decided to toast (bake) some and have them on the side. 

Super successful!

Toasted Tortilla Chips (oven baked)

Set oven temp to 170'c (fan oven)

Cut your mini tortilla breads into eight. 

Spray your non-stick baking tray with light olive oil spray. 

Lay your tortilla pieces out with a slight gap in between. 

Spray with more light olive oil and lightly season. 
We just used salt. 


Bake for 6 minutes and then turn the pieces over. 

Bake for another 6 minutes. 

And voila! Your tortilla chips should be golden and ready to serve. 

Apparently they go stale if you keep them too long. We didn't save any so that wasn't a problem. ;-)


Enjoy!!

Wednesday 14 August 2013

Cafe Review - Patisserie Valerie, Western Road, Hove

Patisserie Valerie, Western Road, Hove

My friend Carol lives opposite this patisserie and has wanted to try the delicacies she sees in the window each day for about a year!  She suggested that we meet for a catch up there.

I should have had a coffee but we have a fantastic coffee maker at home.  (Which has just prompted me to go and make my own before it cools too much.  Splash of gingerbread syrup smells lush and makes me long for crisp autumn days...)

Look at my good intentions to finish off my juices from my detox too!
Doesn't quite work like that, does it!
 
So we met outside Patisserie Valerie at 3pm yesterday.  I went straight to the counter to order only to receive strange looks.  I realised that it must be table service and asked to confirm.  Overall, the service was not good.  Lack of smiles and friendliness was a let down.
 
This French café had a variety of items on the menu that did not scream French to me at all.  The Patisserie section was small in comparison to the rest of foods they offer. Online menu
 
I ordered an peach ice tea which was overly priced at £2.50 a glass.  It was good but didn't go very far.
 
My friend ordered a hot chocolate with cream, which did look good.  When the waiter asked if she would like cream, she giggled in delight of being rebellious in ignoring calories.  He did not look amused but gave a smirk as he walked away. 
 
I ordered a black forest gateaux, having loved this 80s treat as a child.  Carol ordered a double chocolate gateaux with a profiterole on top.  She let me try some and she DEFINITELY made the better choice.  The presentation of both gateaux were beautifully presented.
 

I put this on Facebook and it got a few "ooo"s and "ahhh"s from some girlfriends. 

I was disappointed in the taste of my gateaux.  It was all cream.  And cream that had been put between the sponge a few hours (if not days) before and didn't taste fresh.  The cherries were boozy - nothing wrong with that - but I wanted chocolate and cherries with some cream; not cream with some discreetly tasting chocolate sponge and a few cherries. 

The overall cost for 2 pieces of cake and 2 drinks was almost £15.  It was pricey.  The café looks so lovely and I have wanted to gaze at their window display every time I take the bus past there. 

I would go again but not have the same gateaux and I would have to wait for pay day...!  Oh, and maybe not eat all day before I go.

Overall rating 6/10

Service - 5/10
Cleanliness - 8/10
Presentation - 9/10
Taste - 7/10
Authenticity - 7/10
 

Monday 12 August 2013

Healthy snack ideas - roasted chickpeas

So in order to support the removal of bad snacking habits, I searched and made some healthy snack ideas.

I found this online and used 2 teaspoons of fajita seasoning mix.  Nick thought it was too spicy but I love some spice.  My advice would be to keep roasting them until they are dried out and crunchy.  We decided to stop baking them so they would be crunchy on the outside and like humus in the middle.  That was not the case!  I did, however, use them on salads over the next few days.  I'm a huge fan of chickpeas but if you want crunch, follow the recipe.

                                                   On the baking tray, ready to be roasted.

                                                            Changing colour in the oven.


                                Now I'm writing about them, I had to get some to eat while I type.

                                                                          Yum!!


Spicy Roasted Chickpeas

Ingredients

1 15 oz. can of chickpeas (garbanzo beans)
1 tablespoon olive oil
1/2 teaspoon sea salt
2 teaspoons of spice mixture (a curry, Morrocan, or Mexican spice mixture work well)

Directions

Make sure the chickpeas are completely dry after draining and rinsing them. Otherwise they'll end up chewy and soggy.
  1. Preheat oven to 400°F.
  2. Drain and rinse chickpeas in a colander. Pat dry.
  3. Toss chickpeas in a medium sized bowl with olive oil, sea salt, and spices.
  4. Arrange chickpeas on a baking sheet in a single layer.
  5. Bake for approximately 30 minutes or until crispy. While baking, shake pan or stir chickpeas to avoid burning.
  6. Transfer to a serving bowl.
  7. If desired, sprinkle and toss with more spices.

Too long away from here!

It's been way too long since I sat down to write on here.  Never fear!  I have been baking, cooking and searching online continuously for light bulb creative moments.

As I type, it is August 2013.  My favourite month of the year.  As a teacher, I wait aaaaaaall year for a month away from the classroom to be inspired, take photos and just be me for a while.  It is always this time that makes me wonder whether I want to be in the classroom at all.  I can't say I'm overly excited about September - which is looming closer and closer!

As tradition has become, August lends itself to health.  Before I begin, I should mention that I am overweight.  Seriously in need of weight loss for my general energy and self-confidence to be boosted.  I am the heaviest I have ever been so I started off the week on a detox Juice Cleanse programme from Soul Mate Food.  It was offer on Groupon and a 5 day juice plan.  http://www.soulmatefood.com/menu.aspx#

Last week (being the first week of the month) I went to the gym 6 times in 7 days.  Yes.  6.  Now when I say the gym I actually mean the leisure centre.  I started with Zumba, as I love to dance, and found my toes cramping and sweat dripping into my eyes.  (Sorry!)  The next day I went to the gym for my induction.  I was weighed and measured.  2 strange outcomes from that were that I have one arm 2 cms bigger than the other and that I weighed 14lbs less than I did on my scales at home.  Nevertheless, I powered on through my plan.

On Wednesday, I persuaded my reluctant boyfriend to join me at the gym.  He wasn't so keen but came along anyway.  We plan to go each Weds of this month.

I've been praying to make some friends in Brighton and received a text from a new friend, Sara, who invited me to swim with her on Thursday morning before starting work.  I swam 10 lengths and was out of breath.  (No laughing - I need to get FIT!) I actually thought that Sara and I would swim slowly and chat but she powered on ahead.  So I swam 22 lengths.  22!! A miracle for me.

The lady on the right is meant to be Sara and me on the left!

On Friday I went to Body Pump, which I don't enjoy much but I hope that the sweat means more calories burned off and I begin to see some progress.

On Saturday I went to Zumba again and found that I was not as out of breath as I thought I would be.  Success!  Then I weighed myself and saw that I gained 3lbs more than when I started.  Oh poo!  I posted on Facebook my frustration only be inundated with advice to ditch the scales and measure my body toning up.  I'm booked into the gym next week to do just that. 

On to my next post.  This is boring me and I want to talk about FOOD again!!

Friday 26 July 2013

Home grown Arugula/Rocket pesto

At one point we had so much rocket/arugula growing in the garden, we couldn't keep eating it all.  The home grown plant seems a lot more peppery than the shop bough salad bags.

The plant seems to ending it's crop now so I picked all I could this morning and combined it with what we had in the fridge to make a surprisingly AMAZING pesto!

It is SO simple to make.  I've been meaning to try it for ages and I'm so glad I have now!

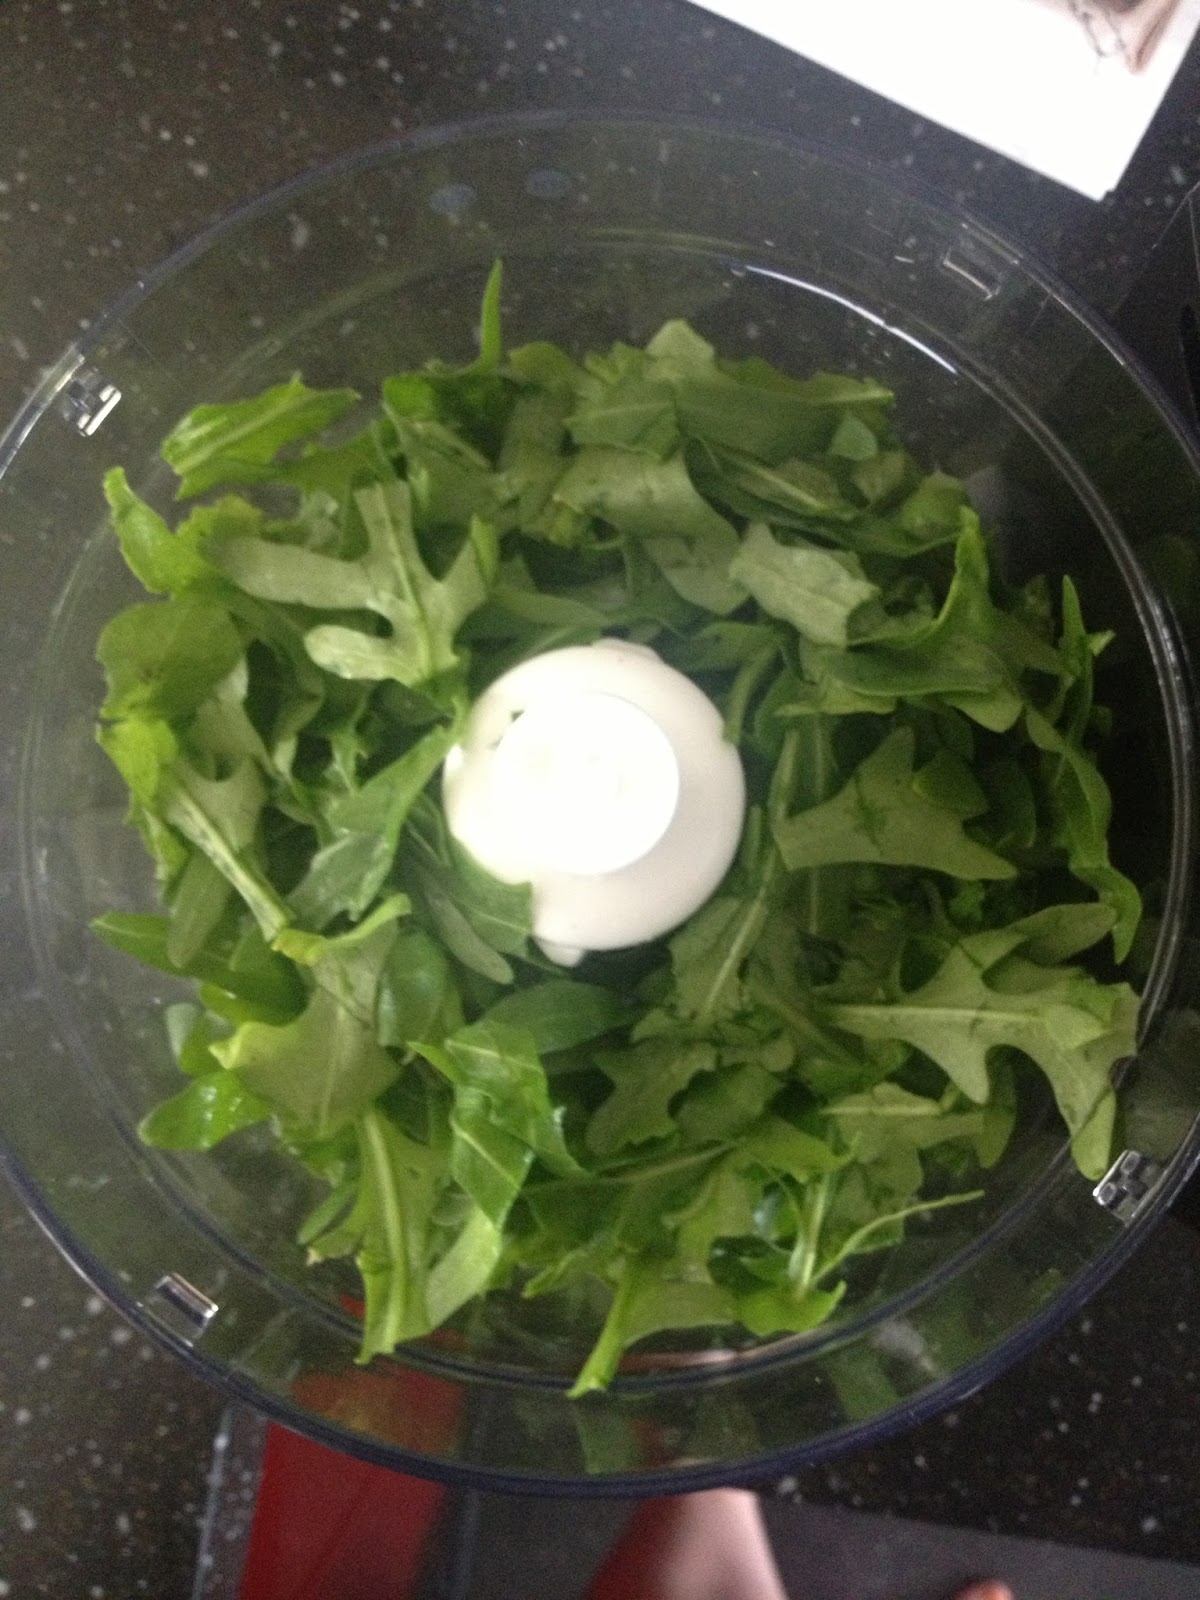
So I picked from the garden and thoroughly washed the leaves to remove all remains of soil - and the green caterpillar hiding amongst them!

I went through the leaves, tearing off parts that other creatures may have got to and making sure to take off any stems. 

 
They're so beautifully green!

 
I toasted off some pine nuts in a pan over a medium heat.  Don't be afraid of letting them warm through but keep an eye on them as they can catch easily.  Mine ALMOST did!
 
 
I slightly blitzed the leaves and pine nuts before adding the other ingredients. 
I wanted to make sure they had a head start!

 
Next I added the finely shaved pecorino cheese, 2 cloves of crushed garlic and 1 tbsp of lemon juice.
 
 
You whizz them in the food processor but not too much because you want some texture.
This is not enough. But I stopped it here to season with salt and freshly ground pepper.

 
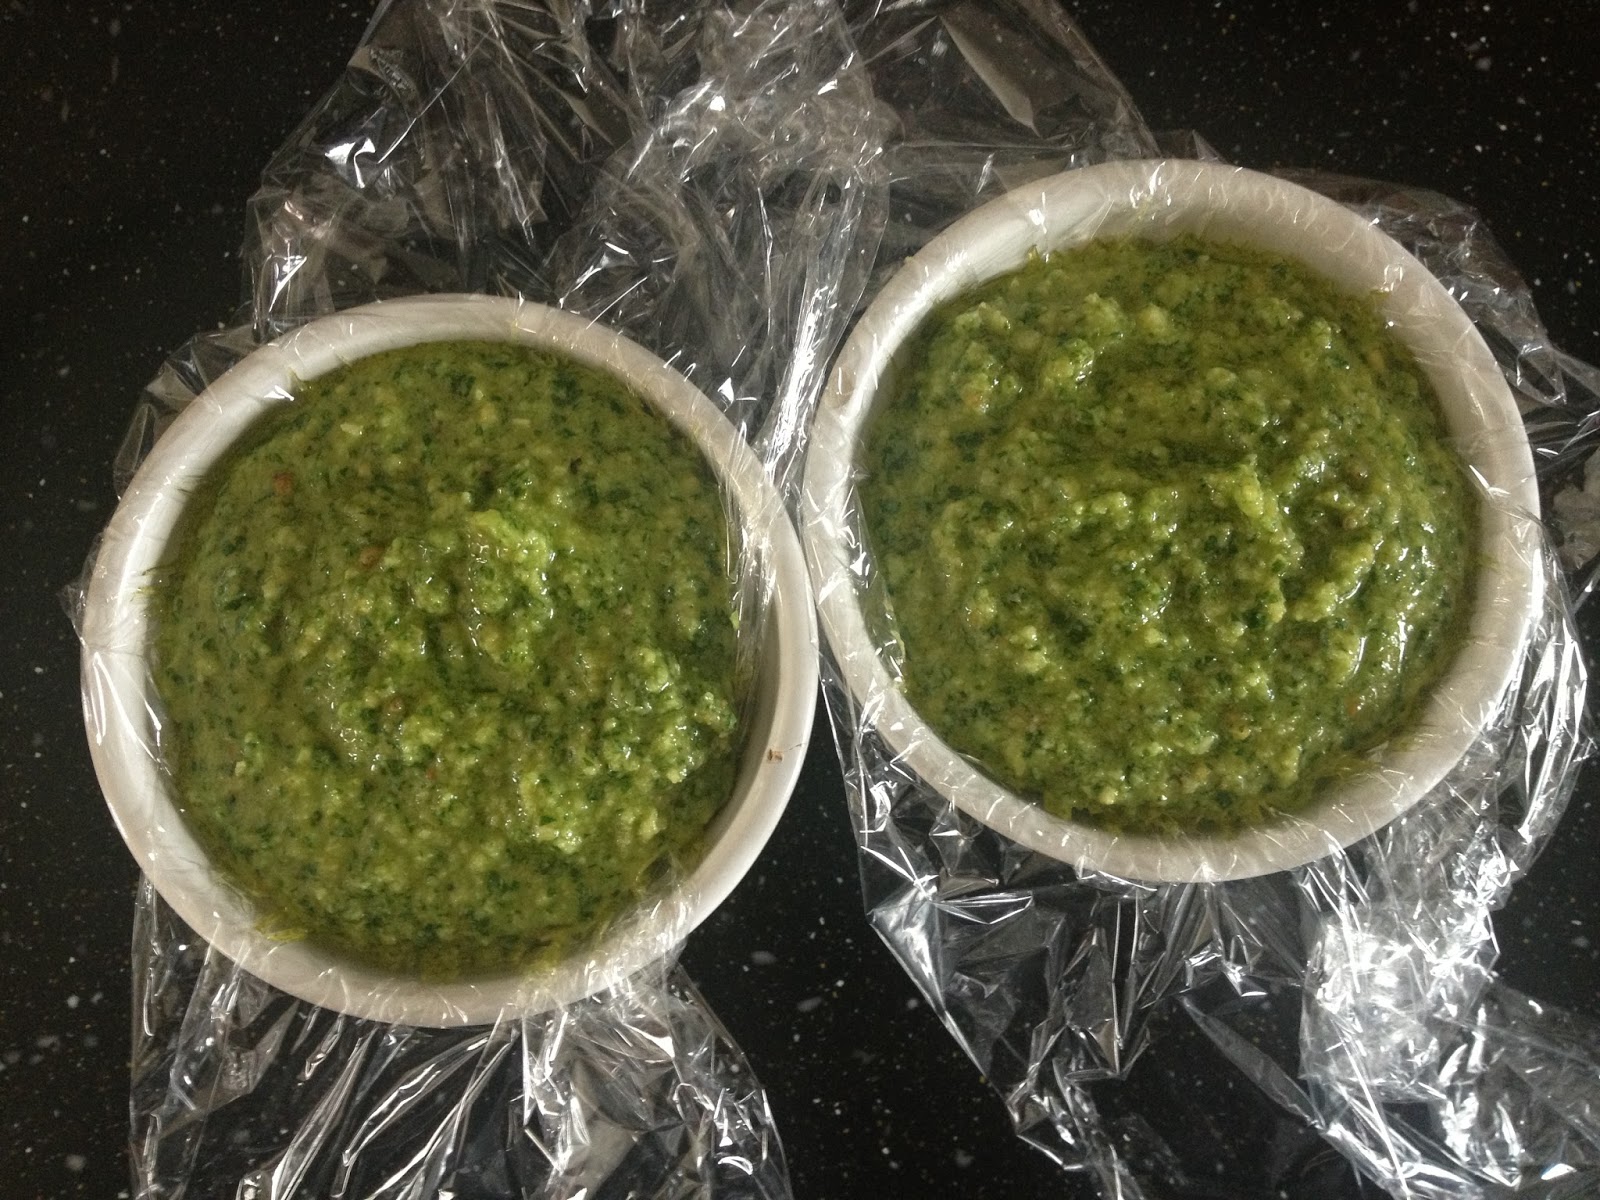
Your finished pesto should be smooth with still some texture from the leaves, nuts and cheese.

 
I lay some cling film in ramequins so that the pesto can be wrapped.
I popped them into the freezer so that we can have a taste of summer during the winter months.
 
I may also have tasted some left in the food processor.......well, you have to don't you!


Rocket/Arugula pesto

around 120g rocket
70g pine nuts
8 tbsp of olive oil (I may have put in 9 1/2!)
1-2 cloves of garlic, peeled and crushed.  (Always 2 for me!)
50g pecorino cheese, finely grated
1tbsp lemon juice
salt and freshly ground black pepper to season

Place all your ingredients into a food processor and puree until the mix is almost smooth but still has texture.
Season to taste.

Saturday 13 July 2013

Buttermilk Pancakes

We bought some buttermilk for a recipe and HAD to make these pancakes.
They're light and fluffy and a taste of a real American breakfast. Yum!!


Buttermilk Pancakes recipe (makes 12)
 
1 cup all-purpose flour
1 tablespoon
1 tsp. baking powder
1/4 tsp salt
1/4 tsp baking soda
1 beaten egg
1 cup buttermilk
2 tbsps oil
 
Mix the dry ingredients together.  In a separate bowl mix the egg, buttermilk and oil together then pour into the dry ingredients.
 
Stir until slightly lumpy and then cook.
 
We used a griddle pan.  They were light and fluffy.
 
I added mixed berries and sour cream as well as some maple syrup.